The Art of the Photo Book with Mark Mancher

The Art of the Photo Book with Mark Mancher


The Art of the Photo / Art book
with Mark Mancher

This note is not intended to be a “how-to” create your own Photo/Art book; numerous websites explain the nuts and bolts far better than I could. Instead, it is a paean to, what I believe is, an art form unto itself and to ask the question – why don’t more of us take advantage of the opportunity to highlight our art or create art using the incredible technology available? Technology which allows us to produce, and even self-publish, our own professional quality Photo/Art books? Particularly at this moment in time, when many of us have a story to tell and the time to tell it. 

Particularly at this moment in time, when many of us have a story to tell and the time to tell it. 

In a time when paper and hardcover books are being supplanted by e-books and audible books, one form of publication cannot easily be replaced by technology – Photo and Art Books. Sometimes referred to with some derision as “coffee table” books, large lush examples published by Rizzoli, Taschen and Phaidon ubiquitously grace the tables and bookshelves in almost every shelter magazine layout. We now all have the ability, with limited “tech expertise,” to create publication-quality, hardcover books, which will look right at home resting alongside the best of those publications. 

Books are easy to create online

There are many sites that offer free downloadable software from Shutterfly, Snapfish and many others. Currently, I use a site called Blurb.com. Most of these sites allow wide customization, innumerable fonts and layouts. You choose the dimensions of the book from several options, the number of pages and the quality of the paper. After you upload your images, you control the arrangement and content of each page and design the cover from a variety of choices.  You can insert text in any way you choose. In short, you have broad artistic control.  After you complete that process, you upload your design and send it off (along with a not insignificant, but not prohibitive, fee) for processing. In short order a very finished looking product arrives at your door. 

Art Books are anthologies.

Most commonly, Art Books are anthologies of the work of the world’s best-known artists and fine art photographers. These unquestionably have value. Without traveling the world, an artist’s work can be admired in a single source and traced through its various stages supported by text and quotes which give the art context. The design, editing and editorial content of the book can express a clear point of view and enhance or even critique the art.

Providing an opportunity to share more.

But, for us, the creation of a Photo/Art book provides an even greater opportunity – the ability to create a personal statement or form of expression which goes beyond what a single image or piece can communicate. To present a body of work and explain in images and words our art and motivation. 

For photographers, the subject matter is limitless, from the simplest details of daily life, like tableaus of daily detritus, to the grand sweep of natural landscapes and everything in between.  In its simplest form, a photo book created on-line answers the question “What do you do with your digital photos?” Many, if not most of us have hundreds of photos lying dormant on our computers (and hundreds of hard copy photos and slides that can be digitized sitting in boxes.) A photobook is a worthy replacement for the old photo album with the advantage that it can be customized, duplicated and doesn’t fall apart. It can be a tool to tell a compelling story of personal or family history, travel and life passage events.

Often uncovering themes

As photographers we often find ourselves drawn to certain subjects which we photograph again and again, street scenes, abstract patterns, nature. Why? Collecting these images and adding to a portfolio is a way to examine these interests. The goal of “working on a book” on the subject is a powerful creative motivator to explore and expand on the theme.  The photographs are no longer an expression of random interest, but a way to more fully examine, for others and ourselves, what draws us to the subject and why it is worthy of appreciation. It captures where we are in the moment and preserves it in tangible form for posterity. 

_____________________________

About Mark Mancher:

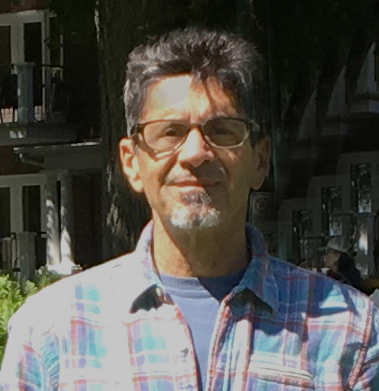
  Mark Mancher is an avid, lifelong, amateur photographer. He is a past Art Guild Photograph exhibition winner and an exhibitor at the Martin Vogel Photography Gallery.  He has a particular interest in the photobook as art, both as a collector and a photographer.   
TAG at Home

[catlist name=tag-at-home]

ONLINE! Tuesday Evening Watercolor with Denis Ponsot

ONLINE! Tuesday Evening Watercolor with Denis Ponsot

WATERCOLOR WITH DENIS PONSOT

TUESDAY EVENINGS, 7pm – 9:30 pm EST

$120 Members/ $155 Non-members

With over twenty years’ experience teaching, Instructor Denis Ponsot has designed this informative class to demonstrate all the “shop tricks” in watercolor painting. Both beginning and experienced students will learn to avoid common pitfalls and advance their abilities. The focus will be on students individually, helping them realize their full watercolor potential. Explore a variety of watercolor techniques with an emphasis on developing one’s own style. Includes demonstrations of color and design, wet on wet, and dry-brush techniques. Students choose to paint from still life arrangements, photos, or their own subjects.

“We look forward to the next class the minute each one is completed! He is engaging and informative….and shares all of his techniques, experiences and varied artistic expressions with the class while giving superb directives for the current work in progress”

SUPPLIES:

  • Arches paper 140lb cold press
    • Either 2 sheets of 22×30 cut into 4 sheets, or a 12×16 block
  • Set of beginner watercolors or watercolors of your choice
    • Denis recommends Cottman for beginners
  • Brushes – #5, #7, #10 and a flat 1/4″ and 1″
  • Miskit or another brand of masking
  • Rubber cement pick up (this is used to take off the Miskit)
  • Pencil (#2H preferred)
  • Eraser (Denis recommends Staedler)

About Denis

Award-winning artist, Denis Ponsot has worked in all of the various media but prefers to work in watercolor. He also teaches watercolor painting, oils, mixed media, and drawing from introductory to advanced levels to children and adults.

He says, “Teaching is my greatest inspiration. The combination of teaching and painting has helped to make my artistic experience complete. Working with students is important to me because I enjoy helping them with their painting and drawing problems. I am able to encourage them to experiment with their own ideas. I take pleasure in helping my students expand their artistic horizons beyond their expectations.” Denis teaches at The Craft Students League and The Kids Club in Manhattan and at the Art Guild in addition to accepting commissions in watercolor, oil, and portrait painting.

Denis has developed watercolor portfolios in three areas: “Landscape,” “Flowers and Still Life” and “The Figure and Portraits.” His work can be viewed on his Facebook page @DenisPonsot or at www.DenisPonsot.com.

A Few More Tips on the Nose with Rob Silverman

A Few More Tips on the Nose with Rob Silverman

portraiture, rob silverman, portraits, nose, nose tips, painting tips, oil tip  

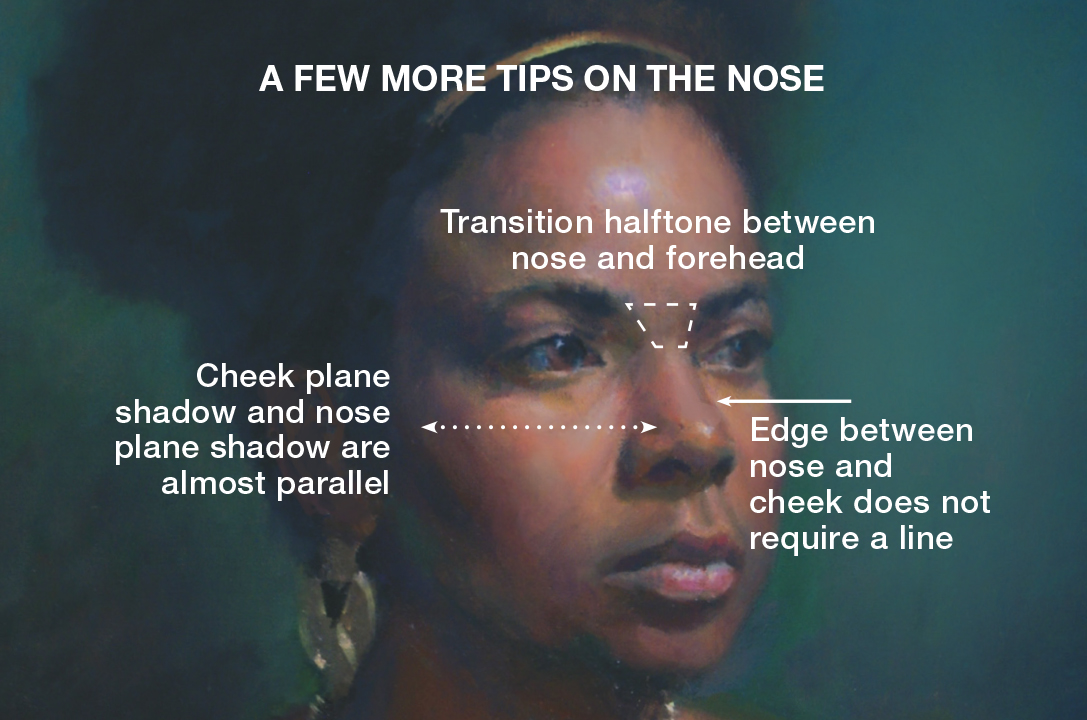
A Few More Tips on the Nose
with Rob Silverman

1. NASAL STRUCTURE

Trapezoid shape, the glabella, between nose and forehead is turned down at an angle, creating a slight halftone.

2. PROFILE

Avoid delineating the bridge of the nose (the side that is turned away from the light source) with a hard line. Use a slight tonal change instead.

3. SHADOW

Nose side plane and cheek plane are familial—the planes are generally parallel, although the nose shadow is made a bit lighter from the reflected light bouncing from the cheek.

_______________________

About Rob Silverman:

Rob Silverman’s innovative techniques have been featured in American Artist Workshop Magazine and The Art of the Portrait, the official publication of the Portrait Society of America. His work has appeared at Crosby Street Gallery and Spring Studio Gallery in Soho, the Art League of Long Island, Edward Hopper House, The Art Guild of Port Washington, The National Art League, the Lockwood-Mathews Museum, as well as the National Arts Club and Salmagundi Club. View his work at silvermanportraits.com

Rob teaches New Strategies & Techniques in Portraiture at The Art Guild on Mondays.

TAG at Home

[catlist name=tag-at-home]

Exercise your brain & enhance creativity with Shelley Holtzman

Exercise your brain & enhance creativity with Shelley Holtzman


Enhance your Creativity with Shelley Holtzman

Drawing with your non-dominant hand helps you get to the core of how you process an image.  The act confuses your brain and leads to creativity. 


Using your non-dominant hand forces you to draw what you see rather than what you know. Lowering your expectations for the finished drawing allows you to make interesting marks and breakthrough the predictable. 

It also is a great exercise for improving brain functioning in general!  So what do you have to lose?  Try it!    

_______________________

About Shelley Holzman

Shelley Holzman  Shelley Holtzman is Co-President of The Art Guild and a member of the Port Washington Library Art Advisory Council.  A former art director for a New York ad agency, her experience with graphic design is evidenced in her work, which emphasizes strong lines and vivid contrasts.  Painting in watercolor or oil, her passion for color can be seen in her florals, landscapes and portraits as she strives to illuminate the vibrancy of people and world around us. Shelley’s art can be viewed at ShelleyHoltzman.com 

Shelley is also a designer for Vida, a sustainable socially conscious global company. Her designs can be viewed at shopvida.com/shelley-holtzman


TAG at Home

[catlist name=tag-at-home]

Using a Fill Flash Outdoors with Daniel Kasle

Using a Fill Flash Outdoors with Daniel Kasle

Using a Fill Flash Outdoors

with Daniel Kasle

Many new and indeed some experienced photographers are skittish about using a flash in an outdoor setting.  Maybe it just isn’t intuitive to bring more light to a brightly lit situation but the simple illustration below shows just how useful a little fill flash can be even in bright sunlight.

 All three featured images were taken at 1/200 sec, f4.5 and ISO 64.

 On a bright sunny day, the harshness of the light, especially around midday, can make creating even a simple portrait a real headache.  Should I have my subject facing the sun?  Back to the sun?  Side angle?  As you move around and try each angle, you may just give up after a few shots of each because none of them look just right.  Waiting for a cloud to pass in front of the sun or finding a shady area may be best but sometimes its just not available and, even if it is, the light might be dappled causing light and dark spots across the subject.

Take for instance image #1 here.  The subject is facing directly into the sun.  First problem is that the harsh light causes parts of her to look blown out (overexposed) while the hard shadows cast uneven light across her face.  Her shirt reflects the sun too, rendering its color to be much less rich than it really is.  Remember the farther away from the light source, the harsher the shadow and the sun is, well, pretty much the farthest light source we have.  Also, any time you have your subject looking directly into the sun, they can’t help but squint and that isn’t going to please them when you show the image.

So, we try turning our subject so that she is backlit by the sun.  Our camera is likely to have a light meter that averages the illumination of a scene and creates an exposure that balances bright and dark areas. 

We can see from image #2 here that our subject now is underexposed and the background is overexposed.  Clearly, not a good combination.  One positive effect though is the highlight that the backlighting has on her hair.  In our final product, it would be nice to keep that element in the image.

The solution…

This is where a fill flash comes in handy.  You can use the built-in flash of your camera or a separate Speedlight either mounted on the camera or handheld to the side but the trick here is to add just enough fill to make the image pleasing and well balanced.  Many current digital cameras have very capable automatic shooting modes that will properly incorporate the camera’s built-in flash with a daylight exposure. 

Image #3 was shot on manual mode (I selected the shutter speed, aperture, and ISO) with a Speedlight mounted to the camera.  I took several exposures with the only difference being varying the power of the flash.  If you have a Speedlight, it pays to spend some time learning how it works and how you can adjust it to provide the right light for the image you are trying to capture.

In Image #3, we now have a good balance of light on the subject and in the background.  We retained the very nice backlight effect on her hair and the fill flash added enough even light to her face to eliminate any shadows.  Also, as she is facing away from the sun, her eyes are open and bright.

_______________________

About Daniel Kasle:

  Dan Kasle has been a photography enthusiast for over fifty years.  He enjoys travel photography and portraiture and has studied at International Center of Photography over a number of years.  Dan and his wife Annette have been residents of Port Washington for 38 years and raised two sons here. His work can be viewed at www.danielkaslephotography.com

Instagram  @danielkasle


TAG at Home

[catlist name=tag-at-home]